
Someone asked me - "Nutster, where and when do you come up with all of the stuff that you come up with?"
"Anywhere and all the time," is my reply.
"How do you remember it?"
"Well, I really can't....no, never have been. It's not an age thing! I write it down. Mark Twain said, 'the faintest ink is better than the best memory' or something to that effect."
I keep my thoughts in a Moleskine journal these days - for those of you who like to journal, pick up one of these. Yes, they cost a little more but, for some reason, they make you want to write in them.
Well...first....you have to get over - not wanting to write in them. The Moleskines are that nice. Trust me, once you break through, you will want to record all kinds of things in them. You'll even learn to conserve space and not just write scattered notes. I mean, it's OK to waste pages but you won't want to. These babies just reek of efficiency!
....but they don't have a pen loop - and a lot of users complain about this lack of a feature. Why don't people do something about it???
And I did - as you can see, I used some of that cool blue painters tape. If I was more of the stylish sort, I would have used black electricians tape. Maybe I will upgrade someday but I come from the form follows function school of thought...
...and blue painters tape is what I had on hand that day.
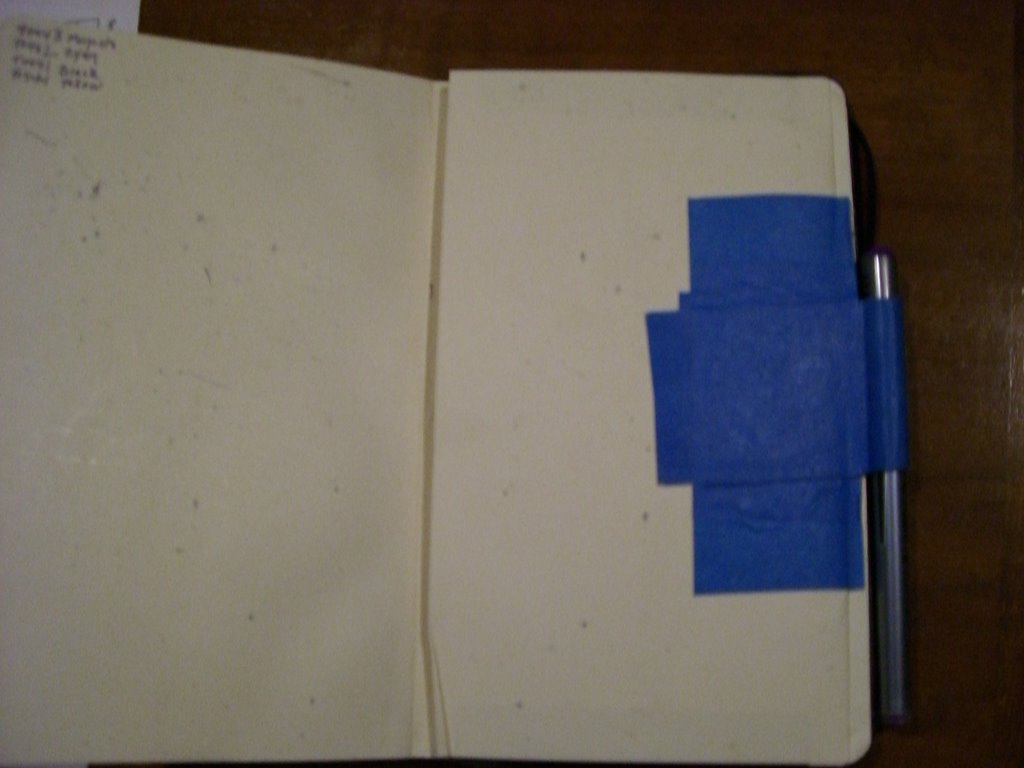
All you need to do is:
Open your Moleskine to the inside of the back cover
1. Cut yourself a piece of tape that is long enough to go from the middle of the journal to the outside edge to your right and back.
2. Cut yourself another piece of tape that is long enough to be the inside lining of the pen loop. If you make it longer than that, you will be fine....this isn't brain surgery.
3. Cut yourself two more pieces of tape about 2 inches long.
4. Take the long tape that you made in step 1 and lay it just about an inch toward the outside of the journal inside the back cover. I say an inch but you can do less. By moving the tape toward the outside from the center of the journal, you are creating enough slack to make the pen loop. Lay it all out WITH THE STICKY SIDE OF THE TAPE FACING YOU.
5. Take the piece of tape that you made in step 2 and lay it STICKY SIDE DOWN in the tape that you just laid out so it will form an inside lining of the part that will be the pen loop. (This is the part that begins at the outside edge of your journal. You can start this inside liner a little to the inside of the outside edge...you don't want sticky tape residue on your pen, right?)
6. Take one of the shorter pieces that you made in step 3 and lay it across your long piece of tape to secure that long piece to the journal.
7. Take your favorite pen. Place it outside the edge of your journal. Wrap the long piece around the pen and bring the long piece back toward the center of the journal. You may want to make the loop a little smaller than you need to so you have to force the pen is later. Doing so will mold the tape to your pen.
8. Take the other short piece of tape that you made in step 3 and lay it across the long piece in the same place that you laid the last cross piece. Keep enough slack on that outside edge for that pen loop you just made!
If you want to add more tape....go right ahead. You can do it with 4 pieces.
Voila!!! - in less than 5 minutes, your pen loop problem is solved!
For more about Moleskine journals and the creative way they are used, visit Moleskinerie.
No comments:
Post a Comment